3 Creating videos with PowerPoint
Robert Hickey
Introduction
Video and film have been used in education for more than 100 years. In 1910 Padraic Pearse was using a projector called the magic lantern to teach his students in St Enda’s school in Rathfarnham, Dublin. The Sesame Workshop introduced one of the first TV programs for teaching children back in 1969 and they are still going strong today. Who can ever forget Big Bird, Bert and Ernie, Elmo or Oscar from Sesame Street?
Why use video in education? It is highly visual. It is now portable and ubiquitous to access thanks to smartphones. It can be paused, rewound and watched multiple times. It is an effective method for conveying information and “telling a story”, which is the original form of education. It can also be produced in bite sizes, allowing you to break down complex ideas into manageable chunks.
I have been flipping most of my classes for more than ten years, and rarely deliver any standard lectures, and if so, it is a micro lecture (5-10 minutes long). Flipping your class is when students engage with the learning material outside of class time, usually beforehand. In my case, this is mostly in the form of a short video. This allows for active interaction between students, and teacher and student during face to face class time. Which assists in deeper and more authentic learning to occur Higher Education Academy, 2018)
Resources
- PC,
- PowerPoint Office Application,
- microphone
- an internet connection
- YouTube account
Steps for Implementation
Step 1. Design and create
Design and create a short PowerPoint presentation for your chosen topic. Instructional design basics should be applied when planning and creating your PowerPoint presentation. Keep your slides visually stimulating by including images, graphs or charts on every slide. Keep text to a minimum. Use animations to emphasize your points. Include footnotes with links to external resources.
Step 2. Record a narration
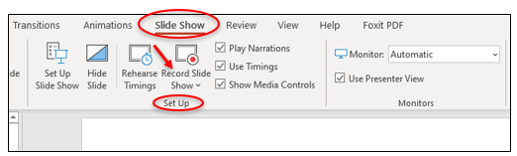
Record a narration over your presentation. On the “Slide Show” tab, in the “Set Up” Group, click the “Record Slide Show” button to begin recording your narration (see Fig 1). You will need to attach a microphone to your PC to record your narration.
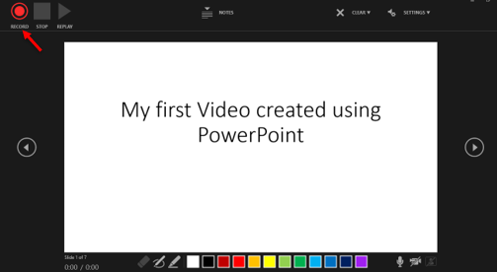
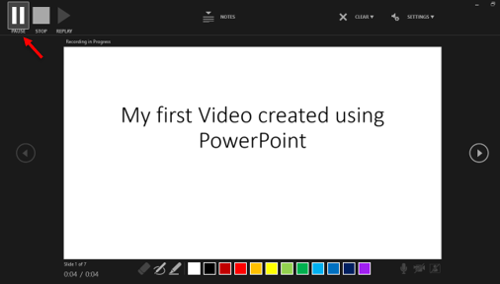
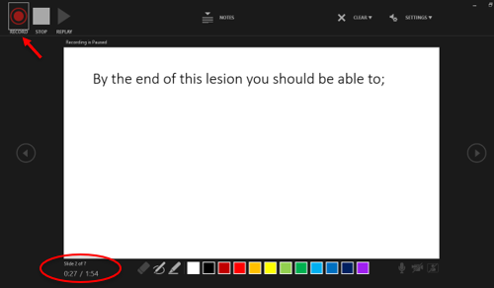
Note: all animations and timings will be included in your recording for inclusion in your final video file. You can start recording, pause, stop and resume recording on each slide until you get the narration just the way you want it (see Fig 2, 3 & 4).
The duration of your presentation is measured using the Slide Show Stopwatch counter in the bottom left of your screen (see Fig 4).
Step 3. Save your PowerPoint
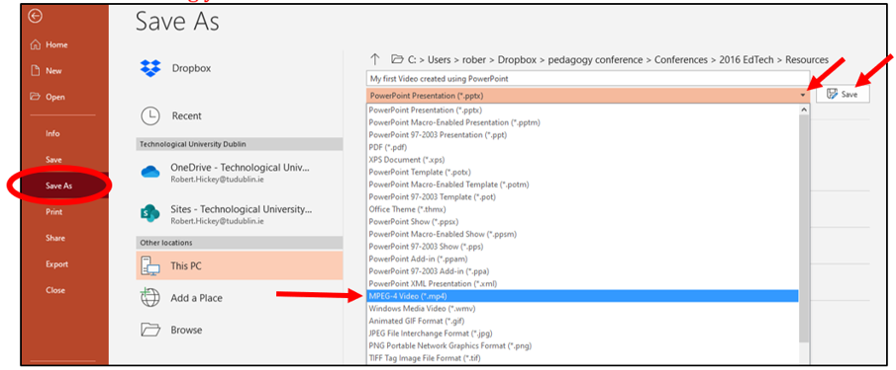
Save your PowerPoint presentation as a MPEG-4 Video (.mp4). Once you are finished recording your narration and have exited the “Record Slide Show” view. Click on the “File” Tab, and then in the “Backstage” view, click the “Save As” Tab on the left of the screen (see Fig 5). Next click on the drop-down arrow beside the “PowerPoint Presentation (.pptx)” file type. Select “MPEG-4 Video (.mp4)” from the list, and then click Save (see Fig 5). PowerPoint will then start converting your presentation to a Video. This might take a while depending on the length of your presentation and the power of your PC. Once converted you will have your PowerPoint file plus a new video file of your presentation.
Step 4. Upload your video
Upload your video file to YouTube/Vimeo or your VLE.
Step 5. Share the link
In Youtube click on the share button, you will be presented with an URL to share with your students in addition to options to embed your video or share through social media.
Top Tips for Success
The great thing about using PowerPoint to create videos is that it is a tool that most educators have used before, so it is not a huge jump for anyone to make. Use good practice when it comes to creating the slides for your presentation. Remember the narration and slides should be able to stand alone so that your student can get what they require from viewing it, without you being present.
Keep the slides visual by using plenty of relevant images. Break up your content into short small chunks in order to keep your viewers attention. There is no problem splitting up a presentation into multiple parts in order to keep them short, e.g. Video 1: Risk Analysis part 1,2,3,4 etc.
If you need to update your video at any time you will still have your original PowerPoint file which will include your narration. It is easy to either delete or insert a new slide into this existing presentation. You can also re-record your narration over any of the existing individual slides, before saving and converting your PowerPoint into a new updated MPEG 4 Video file.
Further Reading
Flipped Learning Network. (2020, 01 12). Flip Learning. Retrieved from FlippedLearnng.Org: https://flippedlearning.org/
St Enda’s School. (2020, 01 12). Prospectus 1910-11. Retrieved from Pearse Museum.ie: http://pearsemuseum.ie/wp-content/uploads/2014/11/Scoil-Éanna-Prospectus-1910-11.pdf
Magic Lantern. (2020, 01 12). Shining a light on a glass lantern collection. Retrieved from National Archives: https://blog.nationalarchives.gov.uk/os-51-shining-light-glass-lantern-collection/
Sesame Workshop. (2020, 01 12). Our History: Explore the Sesame Story. Retrieved from Sesame Workshop.Org https://www.sesameworkshop.org/who-we-are/our-history
Higher Education Authority. (2020, 01 12). Flipped Learning. Retrieved from Advanced Higher Education: https://www.heacademy.ac.uk/knowledge-hub/flipped-learning-0
Author

Robert Hickey: working as a lecturer in TU Dublin Blanchardstown since 2002. Robert’s main area of research focuses on a variety of pedagogical approaches that enable the student to remain at the centre of the learning. Currently teaching a variety of modules in the Engineering Department in Blanchardstown. Robert is also a corporate member of the Institute of Clerk of Works and Construction Inspectorate and a Licentiate of the City and Guilds of London Institute.
ePortfolio
