9 Digital/Interactive Storytelling for Education; Using Twine
Shaun Ferns
Introduction
Digital or Interactive storytelling has roots in traditional media forms such as novels, comics, animation and cinema. Historically, it has borrowed from conventional practices where a creator communicates the narrative to their audience. Developing and publishing of digital stories encourages students to move beyond the role of consumer and into the role of “producer” of media, and thus of culture. At its core, digital storytelling invites you to combine technology, performance, and personal experience to reflect on–and contribute to–the world around us. Students can create digital stories that represent an individual’s voice/perspectives, as well as those of a group or community.
Twine is a popular tool for creating non-linear digital/interactive stories. It is a free, open-source tool that can be used on any device. Users create a visual storyboard linking together the passages of their text. Easy to learn and implement, it does not require coding knowledge. It is easy for students to begin using Twine to create original work, and as learner confidence increases it may be used to teach aspects of HTML, CSS and Javascript. Twine allows for the easy transition from linking text units together to adding variables, conditional logic, HTML and CSS styles, and even scripts to make their digital stories more complex.
Initially, I have trialled Twine during computer clubs(8-12yrs) and recently I have introduced Twine during several modules with the latest being Introduction to Digital Media (1st Year Creative Digital Media). It a great tool for encouraging students to think about the complete development of a digital artefact and as its relatively low tech in terms of complexity students have space to focus on the creation process. For example, without planning the story in detail the digital stories can become too large to manage very quickly, this then provides an opportunity to highlight the importance of multimedia development processes. From a technical perspective, students have an opportunity to include elements that they are learning in Web Development modules in a creative way. This helps to link the technical and creative elements of their programme of study. Previous student digital story ideas have investigated many themes including personal lifestyle, life as a student, becoming a sports star as well as traditional “Choose Your Own Adventure” genres.
Resources
- A device that can connect to the internet
- Twine software
- Twine Cookbook
- itch.io for publishing
Steps for Implementation
Step 1. Open the application
Copy and paste(or click) the following URL into your browser: https://twinery.org/ and you will see a screen like this:
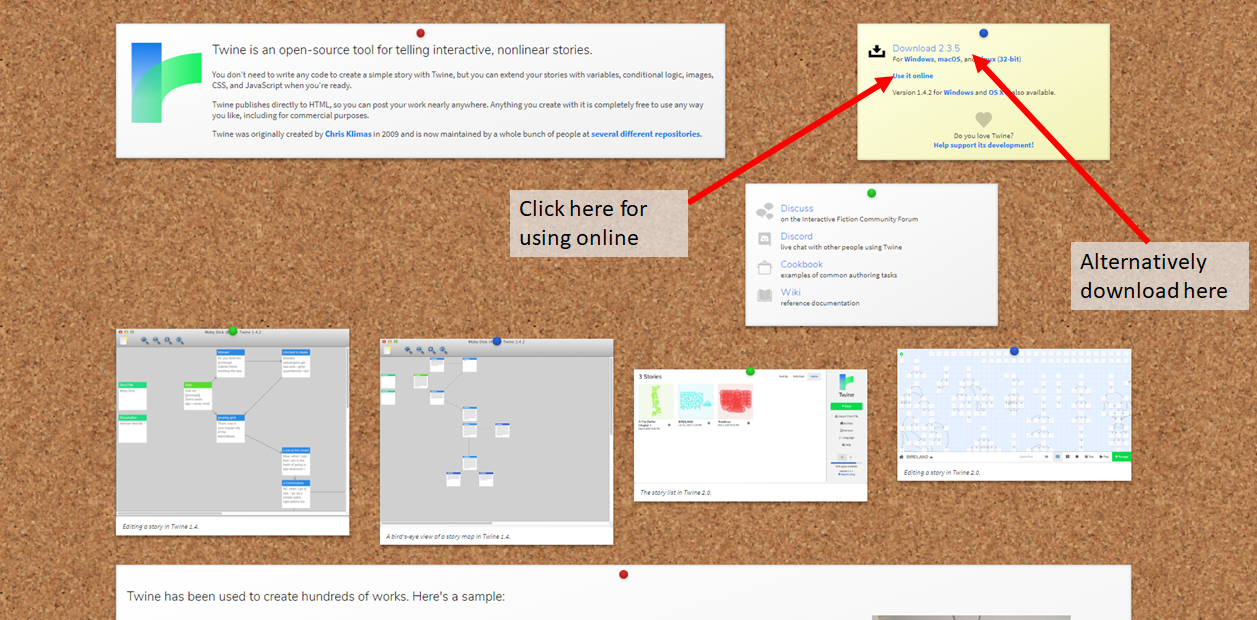
As you can see you will have two options:
- use the browser-based version
- download to your device
Select: Use It Online (as the following steps will demonstrate using the online version)
Step 2. Set up a story
This is the Story List. It should be blank if this is your first time. Next, click the green “+Story” button in the sidebar. When you click that button, you’ll be prompted to name your new story.
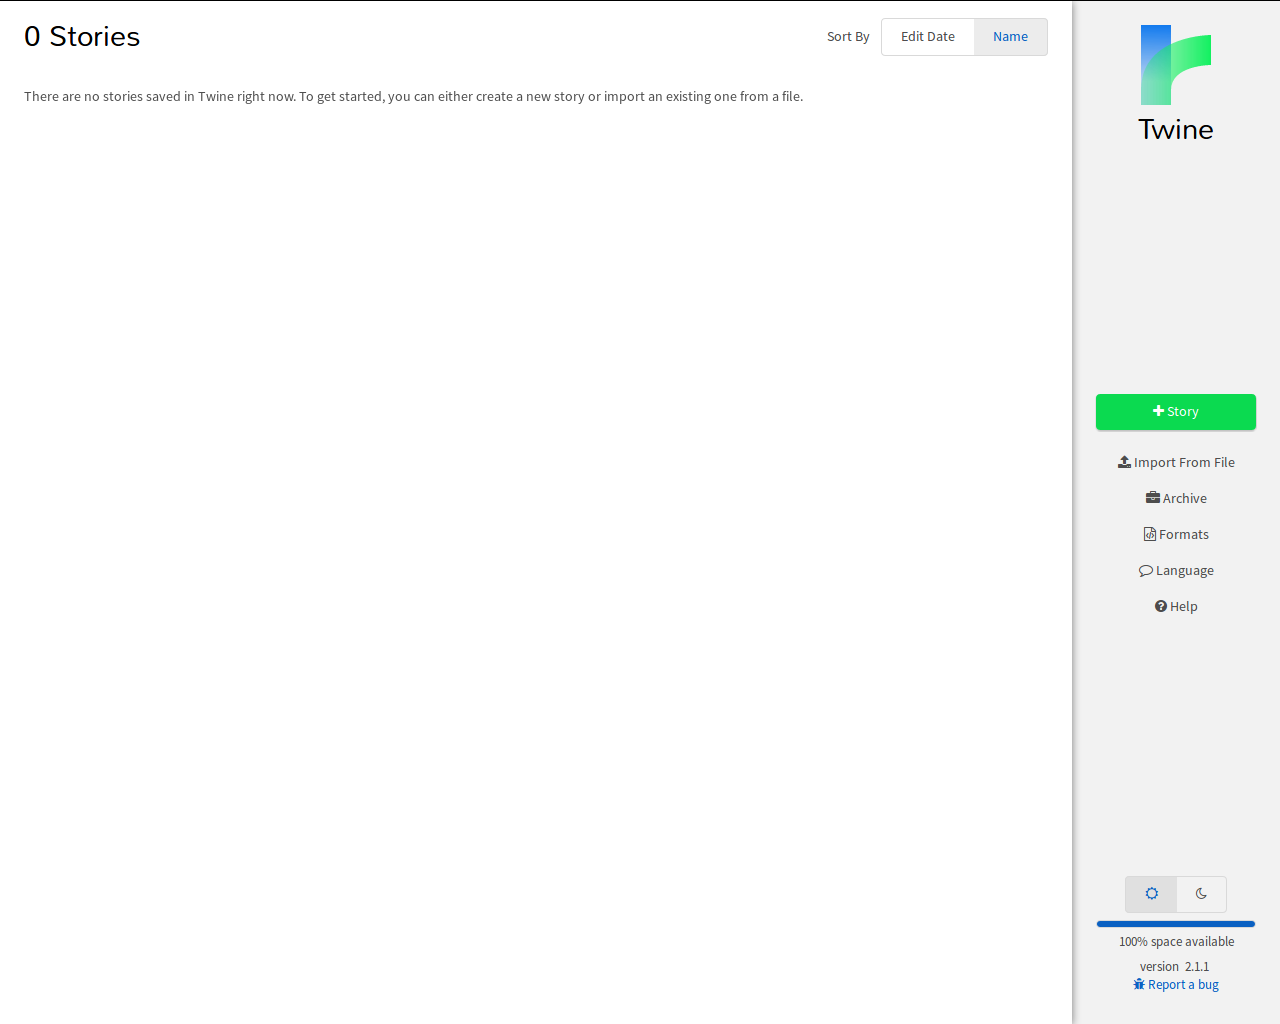
After naming your story there should now be a gridded workshop screen with a post-it note-looking thing in the centre. This is your story!
Step 3. Creating passages
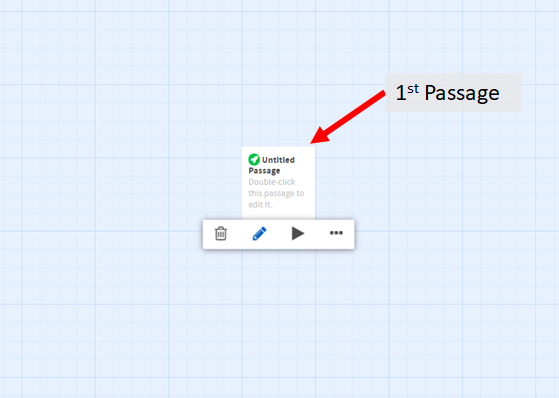
The post-it note-looking thing is called a passage and each passage is a building block in your story. These contain the text and/or images that readers will interact with to go through your story. This first one has a little rocket ship symbol in the top left corner. That means it’s the start of your story. You can add new passages by clicking the big green “+Passage” button in the bottom right corner of the screen.

From that tab you can also zoom in and out with the three gridded square buttons, you can also test a particular passage to make sure it works or play through your whole story.
You can rename the first passage if you’d like.
Step 4. Linking passages
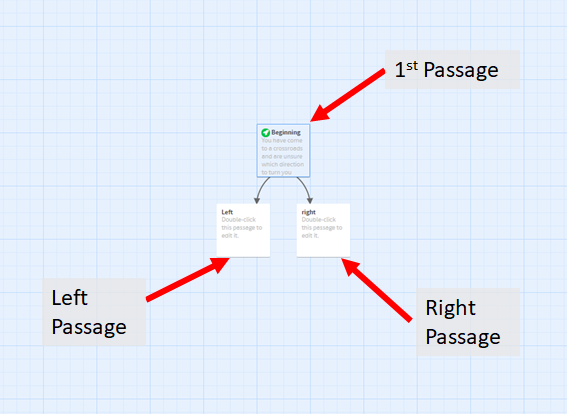
By clicking on the post-it note-looking passage you will see the following screen, Here you can name the passage. In addition, this is where you begin to write your story and add interaction. At the top begin by naming the passage. Following this start to add your story. You may include links to future passages through the use of double brackets. Also, there is nothing limiting you to just two: you can give the reader as many options as you like.
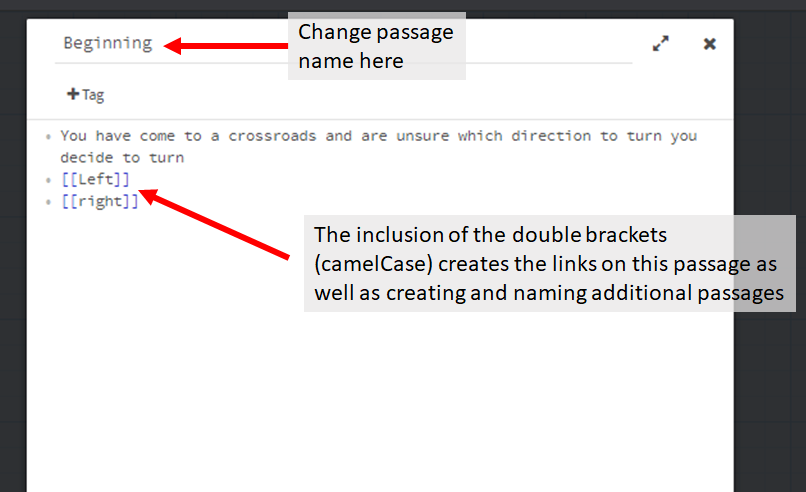
You will notice that when you close this passage (x top right corner or esc key) that two additional passages have been created as per the links created in the previous step.
Step 5. Publishing story
You can click “Play” now, and your story will open in a new tab. It’ll be a three-page story with page one offering the choice of ‘right’ or ‘left’ with a page then for each choice. When you have completed you may wish to share your story.
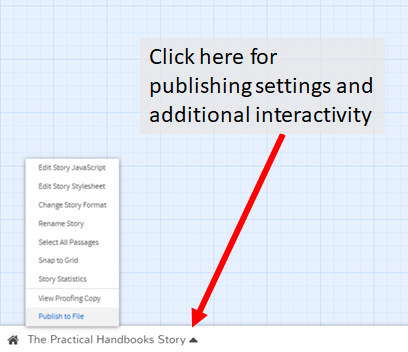
In the online version of Twine, your stories are stored in your web browser and you may risk losing them if you clear your cookies or browser history. The solution is to either use the “Archive” option in the Story List to save a copy of all your work to your computer (good for keeping long-term backups) or to use the “Publish to File” option to save an HTML file of the story you’re currently working on (good for doing quickly and often). As the saved story file is in an HTML it can be published on a server or alternatively on itch.io by following these instructions.
Now that you are able to create a basic non-interactive digital story, you might like to think about how you can improve the look of the story and increase the amount of interaction. As the finished file is a HTML file and it is possible to add elements that you would normally find in a website including HTML elements, CSS styling and Javascript interactive elements. I recommend including elements from the Twine Cookbook.
Top Tips for Success – Dealing with Challenges
- Many students while experimenting with Twine like to jump straight into the software to bring their creations to life essentially developing in tandem with design. This process may work as a quick prototyping exercise, though for creation of a quality artefact I highly recommend storyboarding, mind mapping or drawing a flow chart before implementing their project in Twine.
- Many students find difficulty adding original audio and images to their digital stories. It is recommended that they use audio/image sharing site such as Clyp for audio or Imgur for images. These sites provide URLs for the files to be used in their stories.
- Twine has many options for creating interactive gaming artefacts through the use of HTML and javascript elements that will allow novices to create high-quality artefacts. A learner implementing these should be reminded to plan these out in advance and test at regular intervals to reduce complex errors. It is highly recommended to reference the Twine Cookbook.
- The internet can go down – if learners are using a personal device they can download to the software to run offline.
Further Reading
- Ohler, J. (2006). The world of digital storytelling. Educational Leadership, 44-47.
- Rizvic, S., Boskovic, D., Okanovic, V., & Sl, S. (2019). Interactive digital storytelling: bringing cultural heritage in a classroom.
J. Comput. Educ. , 143-166. - Tytler, S. (2017). ‘TwitFic’, Twine, and Student-Centred Learning: Combining Creativity and Coding in the Classroom.
Africa International Journal of Management Education and Governance, 21-34.
Digital Storytelling Resources
- Teaching with Twine
- Center for Digital Storytelling
- “Integrating digital storytelling into your classroom”
- Digital Storytelling in Education and Publishing Digital Stories
- Ultimate Guide to Storytelling
Alternative Digital Storytelling tools
Author
 Shaun is a lecturer at Technological University Dublin. He is currently teaching on the BA (Hons) in Creative Digital Media where he is lead in the delivery of the Multimedia. He has previously played an active role in teaching, research, academic assessment, course development and the academic direction of several courses including; BS(Hons) in Energy Systems and Industrial Automation & BS in Sustainable Electrical and Control Technology.
He is currently exploring serious games for construction-related training as well as the opportunities transmedia provides in improving user experience and engagement in cultural archive artefacts. His educational research is currently driven by his interest in self-determined learning (heutagogy), rhizomatic learning theory, micro-credentialing /digital badging and curriculum development, previously he has published in areas which include flexible modes of delivery, assessment (peer & self), and active learning strategies.
